Rave on Air Submission Date, IS TODAY. we had to make a suitable file for submission, i set up the blackness. and the title card for Rave on Air SUbmission, and put the music accordingly. I've Uploaded my Video to youtube, i hate youtube. Ohw ell. i uploaded it twice on accident, So here is the Rave on Air Final Edit to our Advert Project. Nothing special, but i worked really hard on this so u give me any stick ill Kill ya! hehe... Enjoy
Friday, 30 May 2008
Music
MUSIC! As the project's sound is restricted with following some copyright rules. Not allowed to use music that isnt our own without expressed permission from the artist themself. Therefore, I had told dan to make music... however dan didnt make music, So i had to learn a program called FL Studio, and make my own. If there is a way to upload that song i don't know it, however it has been planted into the Premier Pro File and successfully works with the scene. took a few tries of Course. Another Section accomplished by me.. yet again. Feels like im dying.
Wednesday, 28 May 2008
Complications In rendering(god im sleepy)
We've been rendering for weeks, and i mean weeks. Mostly because of idiot mistakes.
the Main Goal we are trying to achieve is a decent looking car covered by ice, then turns to ice transition. However as the ice model of the car we have is OLD. and i've updated the car. the ice model is a bit, OFF.
the Main Goal we are trying to achieve is a decent looking car covered by ice, then turns to ice transition. However as the ice model of the car we have is OLD. and i've updated the car. the ice model is a bit, OFF.
I wanted it remade but within the new time constraints its not all that possible. So one batch of renders was alright, but a few things were noticed that we really don't want. the way the ice covers the car as if there was a blanket of ice hanging in the air. then the car drives through it to be covered. Not what we want. so i spent a good 15 -20 hours editing each frame to erase that blanket of ice and only keep where the ice is deformed by the car going through it.
It still needs Some cleaning up but after a while it worked.
With that, i took the layers i edited, and then took the layer of the car, and then the background and pieced them together in Premier Pro. and another problem presented itself, Dan's scene doesnt have shadows turned on!!!... RE-RENDER.

After about... 5 re-renders of some of the main transformation scenes cameras. i beleive we have what we want for a transformation. it isnt as creative as we hope. but with the new deadline of may 30th sacrifices must be made. Im very sleepy from all of this. but the frames need more cleaning to be a bit smoother and not have the shadows of some things show up. But after editing hundreds of frames 1 by 1 by hand in photoshop. I think it's High time i shove the clean up process onto dans lap.

All thats left is to render the last 10 or so seconds of the scene. then add in some nice text here n there. and bam all visuals complete. I just Need to see if i can get FL to work and remix some sound into this Advert. Im Exhausted!!!


Saturday, 10 May 2008

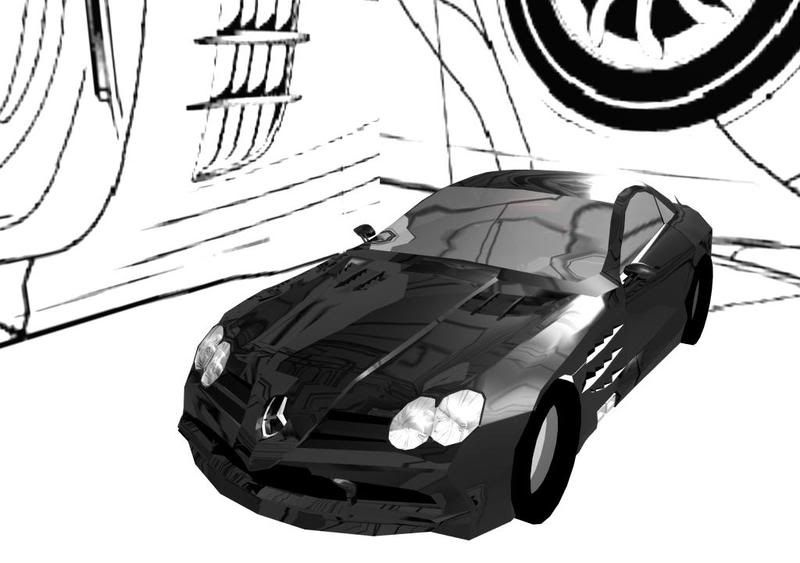
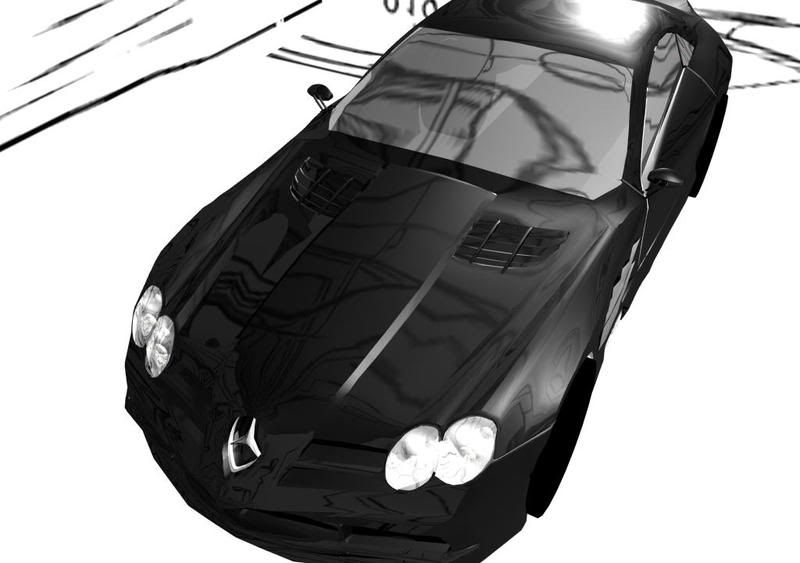
Wheels, And Wheels Tutorial (Set driven Keys)
Okay, i made t he wheels finally! time to make them spin. I want the wheels to move as the caramoves. and I found a decent tutorial over at Autodesk's animators community. However the guy was a bit of an idiot. so i will go over it as i did it while giving a link to the tutorial (u have to sign up) so the mistakes he make can be clearly seen. and not be cause for confusion.
http://area.autodesk.com/index.php/tutorials/tutorial_index/rotating_wheels_on_a_car/
Okay, first step basically. is to have your scene open. haha.. no really have your scene open.
what you need to do is have the car GROUPED and the wheels INDIVIDUALLY grouped. after grouping the wheels make sure to center the pivot (modify -> center pivot).
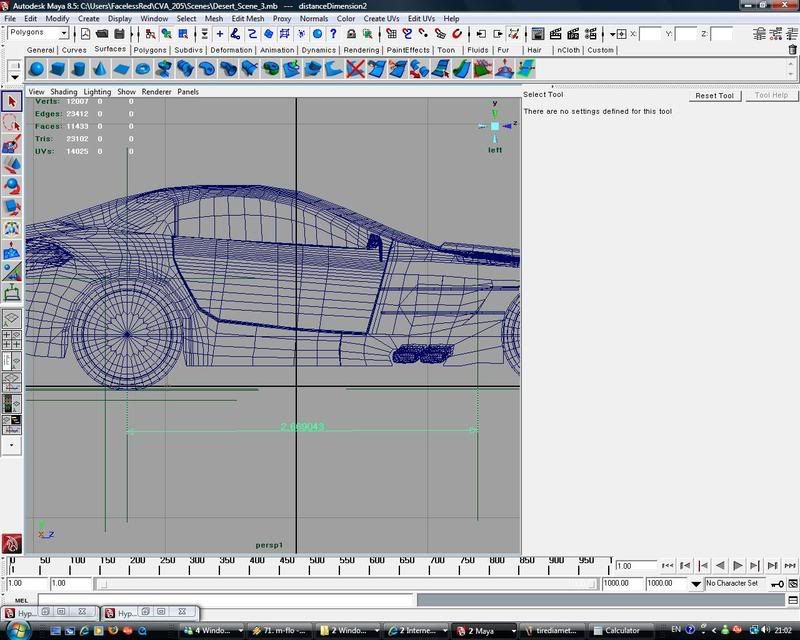
What I needed to find out first was the distance it would take to have my car's wheel turn a full 360 degrees. in order to find out u need to use a distance formula. the formula being
(Pi x 2) x Radius = Distance
the tutorial says (P x 2) + Radius = Distance. thats bollocks. First off P can mean parameter, which would be a big mistake. and he also uses his wheels DIAMETER instead of the wheels radius in place of the RADIUS of his formula, so i came to the conclusion this guy is kinda stupid.
http://area.autodesk.com/index.php/tutorials/tutorial_index/rotating_wheels_on_a_car/
Okay, first step basically. is to have your scene open. haha.. no really have your scene open.
what you need to do is have the car GROUPED and the wheels INDIVIDUALLY grouped. after grouping the wheels make sure to center the pivot (modify -> center pivot).
What I needed to find out first was the distance it would take to have my car's wheel turn a full 360 degrees. in order to find out u need to use a distance formula. the formula being
(Pi x 2) x Radius = Distance
the tutorial says (P x 2) + Radius = Distance. thats bollocks. First off P can mean parameter, which would be a big mistake. and he also uses his wheels DIAMETER instead of the wheels radius in place of the RADIUS of his formula, so i came to the conclusion this guy is kinda stupid.
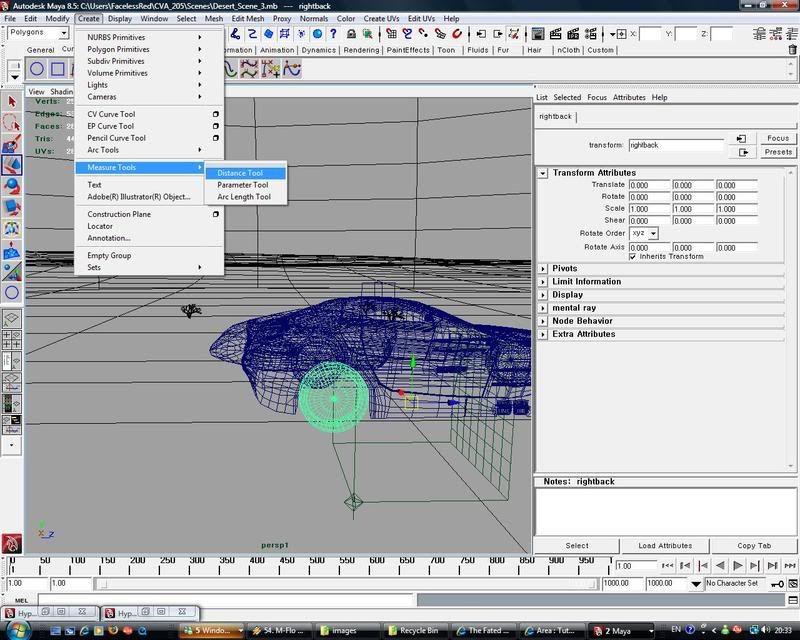
go to Create -> Measuring tools -> Distance tool.
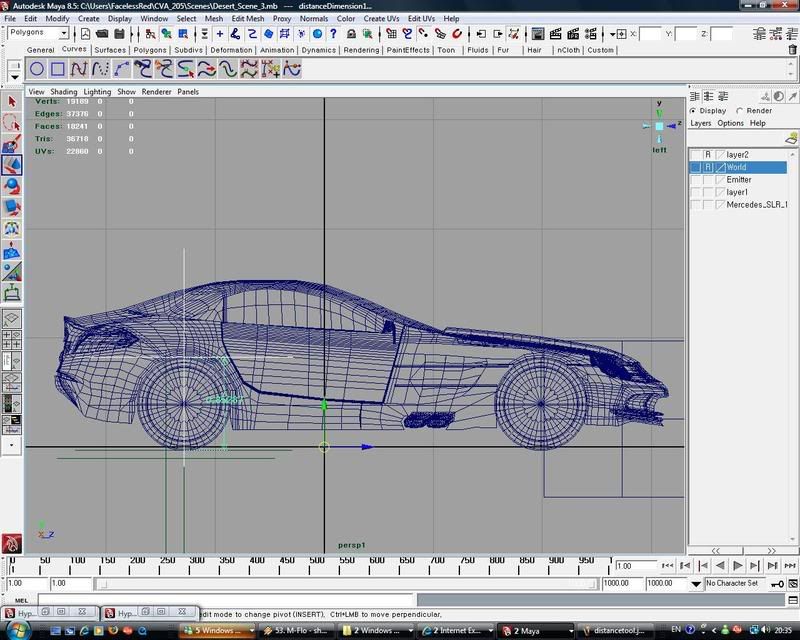
Turn on snap to points in your window and then click and snap the tool to the Bottom Middle of your tire. and then snap the other click of the tool the top middle of your tire. You now have the diameter. (alternatively you can snap it to the center to get the radius right away, but with the amount of vertson my model i didnt 100% trust snapping it to the center) Divide the diameter by two, and you have your radius. now we can figure out the distance the tire will travel
Pi = 3.14 in this calculation, unless u wanna be even more accurate. and take it to a few degrees further.
(My diameter is approximately 8.5.)
(3.14 x 2 ) x .425 = Distance
6.28 x .425 = 2.669
2.669 is the distance my car's wheel has to move forward to turn a full 360 degrees.
then use the measurement tool again to draw that distance in front of one of your wheels from the middle of the wheel then move it forward the distance. (in my case 2.669)
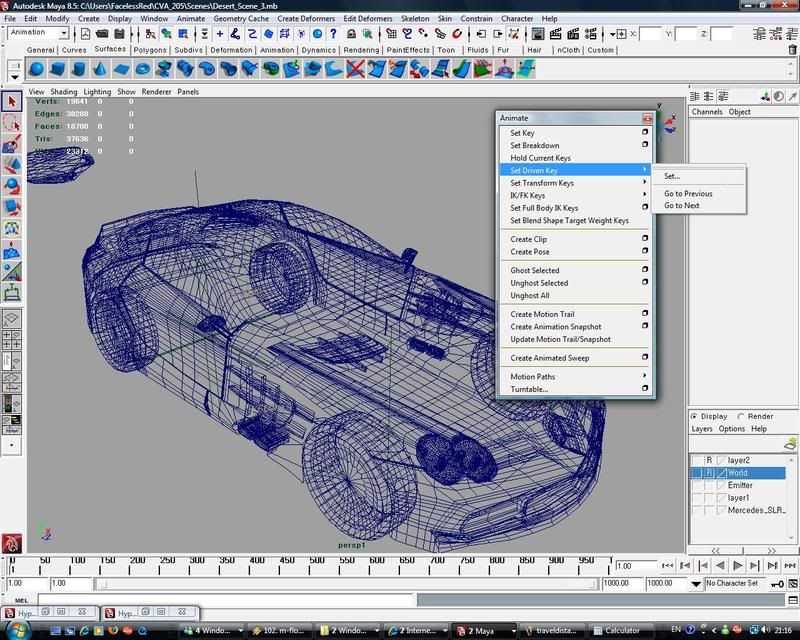
then select the group of the entire car and open up the set driven options.
While the group is select, click "Load Driver" at thebottom of the window that appeared. and then in the right window click the car's groups translate Z.
then select all 4 wheel groups. And click load Driven. then select all 4 Wheels in the window, and to the right click the Rotate X. and then press "KEY"
that sets the Default Posistion of 0 rotates to the wheels.
Now select the group that is a part of the entire car again and now move it the distance the wheels take to move a full 360, marked by the measurement tool that u drew earlier. type in what u need to type into the translate Z (for me thats 2.669) (Do not try to key this number btw, nothing is keyed as if u were making time lined animation)
then go back into the driven key window, and select the 4 wheel groups. and in the channel box put the rotate X to 360. And thenback int he driven key window Press the KEY button. that sets the End rotatation. for the distance (2.669).
drag it, and the wheels will spin accordingly. but only for 2.669 distance. afterwards it stops.
Select those wheel groups again, and now we open the graph editor (windows-> animation-> editors-> graph editor) Select t he curve you see (not much of a curve lol) and t hen go to.

Curves -> Pre-inifnity->cycle
then additionally while those curves are still selected go to
Curves -> post-inifnity->Cycle.
And that is it. that covers that guys tutorial. and corrects his stupid formula. I did more. By adding a nurbs circle to w here i wanted and froze its transformations. Then opened up th e connection editor.
then select the group of the entire car and open up the set driven options.
While the group is select, click "Load Driver" at thebottom of the window that appeared. and then in the right window click the car's groups translate Z.
then select all 4 wheel groups. And click load Driven. then select all 4 Wheels in the window, and to the right click the Rotate X. and then press "KEY"
that sets the Default Posistion of 0 rotates to the wheels.
Now select the group that is a part of the entire car again and now move it the distance the wheels take to move a full 360, marked by the measurement tool that u drew earlier. type in what u need to type into the translate Z (for me thats 2.669) (Do not try to key this number btw, nothing is keyed as if u were making time lined animation)
then go back into the driven key window, and select the 4 wheel groups. and in the channel box put the rotate X to 360. And thenback int he driven key window Press the KEY button. that sets the End rotatation. for the distance (2.669).
drag it, and the wheels will spin accordingly. but only for 2.669 distance. afterwards it stops.
Select those wheel groups again, and now we open the graph editor (windows-> animation-> editors-> graph editor) Select t he curve you see (not much of a curve lol) and t hen go to.
Curves -> Pre-inifnity->cycle
then additionally while those curves are still selected go to
Curves -> post-inifnity->Cycle.
And that is it. that covers that guys tutorial. and corrects his stupid formula. I did more. By adding a nurbs circle to w here i wanted and froze its transformations. Then opened up th e connection editor.
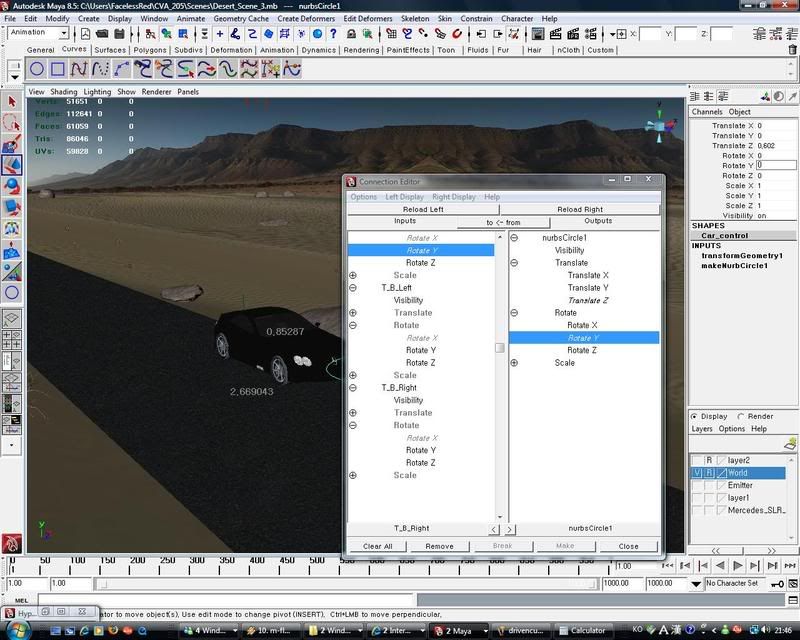
and connected the nurbs circles translate Z to the mercedes' group translate Z, and then connected the two front wheels rotate Y to the nurbs circles rotate y, to make an easily turnable wheel.
well I am gonna give the scene to dan now, but i will prolly have to give my advice as he animates the rest, because his camera angle idea's are a bit on the narrow side, we need more camera angels. tonns of em so that we can utilize what we need to make this 30 seconds long. the particle work he has done is amazing though. wish my PC could handle it. Hopefully here on out its smooth sailing. ALMOST DONE!
Work Progress 3
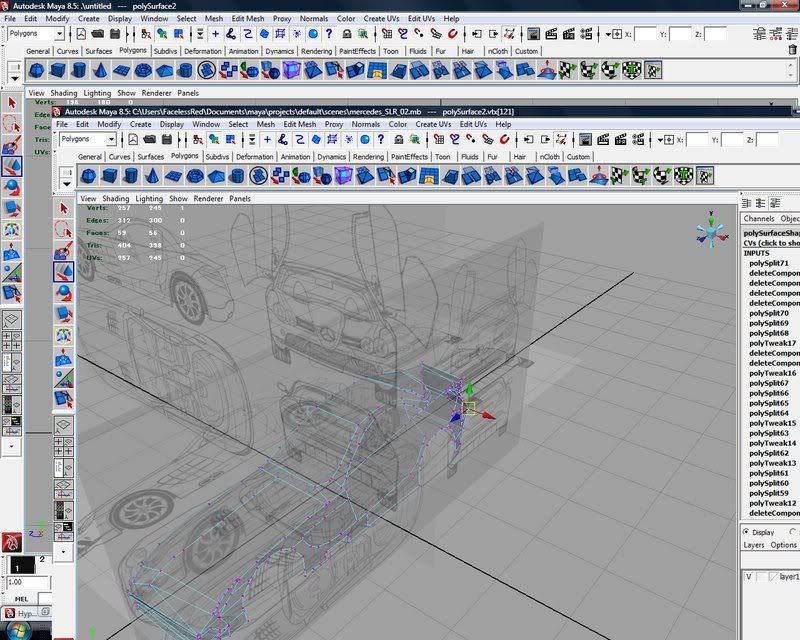
kinda skipping chunks of work as i go, i ont do well keeping up with screenshotting step by step. here is some of the stuff i've managed to get done.


Current problems are when the sand has a bump map it appears more pixelated im guessing because the image doesnt quite have the resolution i need it to have. i will try shrinking it a bit more without having the loop show through.
Current problems are when the sand has a bump map it appears more pixelated im guessing because the image doesnt quite have the resolution i need it to have. i will try shrinking it a bit more without having the loop show through.
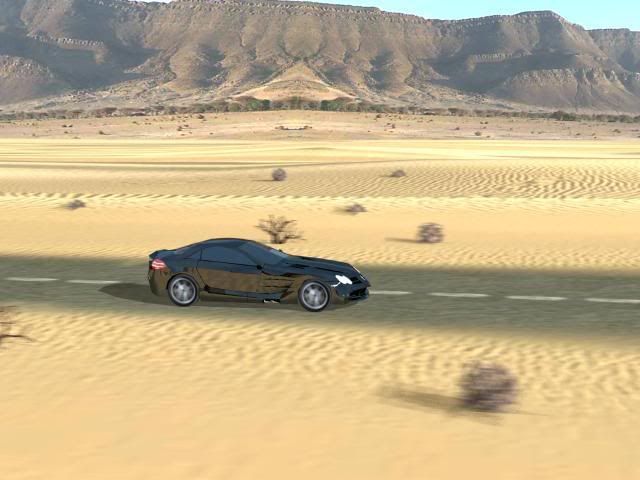
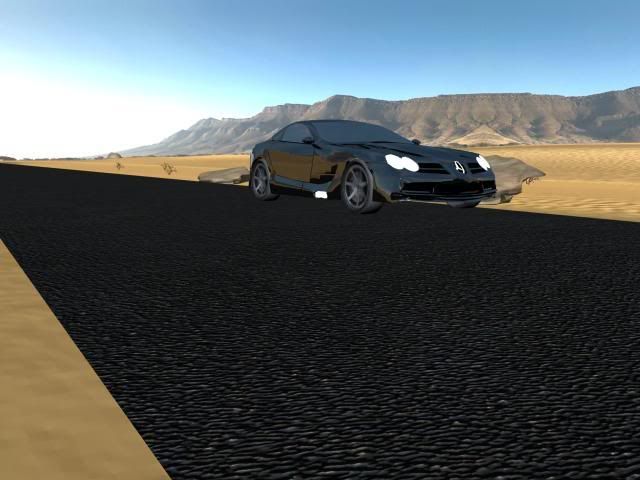
work progress 2
More Production pictures, i just kinda kept going mindlessly. it isnt the bes geometry i've done and the car currently still needs a bit of work, to be accurate to the design of the car, but i made a few mistakes that are hard to go back on. i can go back and fix it b ut right now there is no need for the Aim of the project doesnt require absolute detail.


Subscribe to:
Posts (Atom)